Monday, March 31, 2008

Thai Noodles - Noob style!

I originally got into Thai food like most other people...through Pad Thai at various locales around the area. And like other inquisitive eaters before me, I had to try making this awesome new dish.

Turns out it's not as easy as it looks. Getting the ingredients isn't necessarily the hard part...but I've never managed to get the sauce to taste right. I've given up since and searched for some of the easier dishes to make, leading me to today's post. I found multiple recipes for Pad See Ew over the past few months and compiled them all together for a "distinct" version I guess.

I'm a huge fan of fresh rice noodles...in fact, it's probably one of my favorite noodles to supplement a dish with. And also, living near Super 88 is a huge plus, where they have fresh rice noodles daily! I always buy the precut ones since I'm lazy but you can also get the wedges and cut them yourself (If you like different shapes anyway)

Pad See Ew

Main Ingredients
1 lb fresh rice noodles (sliced into bite sized pieces)
1 lb beef (I like to use sirloin tips or flank)
2 large bunches of broccoli florets (more if you like broccoli :P)
2 eggs

Marinade
3-5 garlic cloves minced
1 tbsp corn starch
1 tbsp rice wine (I use Shaoshing)
1 tbsp fish sauce
3 tbsp ketjap manis (sweet soy sauce)
2 tbsp oyster sauce
1 tbsp sugar
1 tsp sesame oil
1 tsp ground black pepper
1 tsp ground white pepper
1 tbsp minced ginger
1 spring onion (I've used 2-3 scallions as well)
3-4 thai chillies (chopped, with seeds)

Extra Sauce
1 tbsp fish sauce
2 tbsp oyster sauce
2 tbsp ketjap manis

Method
1. Slice the meat, mix in marinade. Let marinate for about 20-30 minutes (overnight is ok but unneeded)
2. Slice up the broccoli florets into bite sized (or smaller) pieces. This way the pieces of broccoli will soak up the sauce faster.
3. Heat wok to medium-high, and stir fry the marinated beef until slightly browned.
4. Add broccoli, stir fry for about a minute to get the broccoli mixed well.
5. Add noodles and the sauce. Mix well.
6. Make a little well in the middle of the wok, crack the two eggs in and stir fry until egg is fully cooked through and mix well with the rest of the dish.

Enjoy!

Thursday, March 27, 2008

Rod Dee and a little surprise :P

Been meaning to get around to posting about one of my favorite restaurants in the area and now decided I can't put it off any more. Rod Dee has two locations, one of which is very close in Coolidge Corner. It is generally a take-out/delivery place with a few tables for the occasional visitor to sit in.

That being said, I didn't actually know about this place when I moved into the area. My buddy from Thailand, Dana, raved that this was his favorite Thai restaurant in the Boston area and that had me convinced. Now, I frequent the place at least once a week, craving their Tom Yum Noodle Soup every time!

For a sub $10 meal, you really can't go wrong here...everything is fantastic and they have different specials every day. And as is with most Thai restaurants, just because it's not on the menu doesn't mean they won't make it for you!

The pictures below are of the Tom Yum Noodle Soup. It's my favorite dish there and I've never found anything like it at any other Thai restaurant. Other dishes I end up getting on a regular basis include the Indonesian Fried Rice, Boat Noodle Soup, Pad Kra Pao (Basil chicken over rice), and Kua Gai.


And one last note, I couldn't ask for better friends! They surprised me yesterday with a nice ice cream cake sporting my (according to Jason) trademark phrase! Thanks everyone!

Monday, March 24, 2008

Broiled Sea Bass

I had a nice large piece of sea bass that I was going to do something fancier with but I ended up getting lazy and just broiling it. I've always liked fish but the main reason I usually don't cook it often is that I have to buy it and then cook it that day (or the next). That and fish tends to be on the expensive side of the meals that I usually make :)

So while broiling is really easy, cleaning the pan is a pain in the butt! Even after soaking the pan, it still is a little smelly and I wasn't able to clean all the gunk off :( So I'll be using tin foil next time!

Anyway, here's all you do:

1. Rub salt, pepper, some garlic, and some lemon juice onto the fish.
2. Broil for 8-10 minutes.
3. Eat.

Wednesday, March 19, 2008

"Spicy" Macaroni with Cheese

I made this dish a couple weeks ago for the potluck dinner and it was pretty tasty despite the distinct lack of spice and my clumsy fingers. Clumsiness in that I did not mix the pasta together well enough with the other ingredients to get a good distribution throughout the dish, rather there were spots flourishing with vegetables and cheese and then sections of barren pasta wasteland. But all in all, it was very good!

My sister gets part of the credit (not full credit because she found it on food network :P) for the recipe. But she'll have plenty of opportunities for more credit soon when she teaches me how to make her famous cheesecake!

Spicy Macaroni with Cheese

Ingredients
1 pound Cellentani pasta (Food Network suggests elbow macaroni but I like this pasta better)
3 tablespoons extra-virgin olive oil
1 onion, chopped
4 cloves garlic, chopped
1 (14.5-ounce) can diced tomatoes
1 (10-ounce) package frozen spinach, thawed and drained of excess liquid
1 tbsp red pepper flakes
1/2 cups bread crumbs
1/4 cup grated Parmesan
1/3 cup grated Parmesan (separate from the 1/4 cup)
1/4 cup grated Romano
1/3 cup grated Romano (separate from the 1/4 cup)
2 tablespoons butter, softened, plus 2 tablespoons
12 ounces mozzarella cubed
1/4 teaspoon freshly ground nutmeg

Method
1. Preheat the oven to 350 degrees F.
2. Cook the pasta until al dente (about 8-10 minutes depending on the pasta)
3. Heat the olive oil over medium heat. Add the onion and garlic and cook until the onion is golden, about 7 minutes. Add the tomatoes, spinach, and red pepper flakes. Stir to combine and cook until heated through, about 5 minutes.
4. Mix together the bread crumbs, 1/4 cup Parmesan, and 1/4 cup Romano. Spread the softened butter in a glass baking dish and sprinkle half of the bread crumb mixture inside the dish to coat.
5. In a large bowl combine the vegetable mixture with the cooked macaroni, cubed mozzarella, the remaining Parmesan and Romano cheeses, and the nutmeg. Spoon into the prepared baking dish, top with the remaining bread crumb mixture, and dot the top with the remaining butter.
6. Bake until the top is golden brown, about 30 to 40 minutes.

Enjoy!

Sunday, March 16, 2008

Lambert's Rainbow Fruit

I actually spent about a year working in Norwood before I found Lambert's and it appalls me how that happened given that I have to drive past it every night on the way home. And especially since I can walk there from work for lunch!

Lambert's is mainly a deli counter and fresh produce kind of grocery. No meat/fish section and some very small selections of stuff like pasta, baking goods and whatnot. What they do have though are a lot of specialty sauces/jams for marinades and whatnot such as Stonewall Kitchen jams and spreads. I use these jams for the baked brie :). And one last note that they sell freshly ground spices (which is a huuuuuge deal).

Also, for a hearty lunch (and possibly dinner because of leftovers!), Lambert's deli counter makes some extremely massive sandwiches. Maybe not on the level of Harold's New York Deli but they're still large enough anyway that one could easily chow down on half of the sandwich and save the other half for a nicely sized dinner. They also bake rotisserie chickens, spare ribs, and fresh calzones (The calzones are VERY hearty as well...oy!) as well as serving at least 6 different types of soup every day. And I need to mention the salad bar...one of the largest I've ever seen!

Wednesday, March 12, 2008

Baked Brie!!! Finally!

I had some other pictures for the brie but unfortunately, having some computer issues that may take a week or two to resolve (bad parts). But at least I have the laptop and the camera's available for new photos.

Ever since I started the Seasoned Noob, I've been asked (nagged =P) by some friends (you know who you are) to post this recipe. I made it 6 months ago for my housewarming party and it was an instant hit.

I use a jam spread from Stonewall Kitchen. You can probably use almost any kind of jelly, just that this jelly happens to be stacked next to the brie :)

Baked Brie

Ingredients
1 (7-8 inch) wheel of brie cheese (Usually buy mine at Whole Foods)
Hot pepper jelly
Brown sugar
1 sheet puff pastry
Some flour

Method
1. Preheat the oven to 400 degrees F
2. Cut the brie in half horizontally.
3. Sprinkle brown sugar over one half to coat.
4. Spread the jam on the other half to coat.
5. Put both halves together and press to secure. The trick is not to put too much brown sugar or jam so that it comes out the sides :)
6. Roll out the puff pastry and place the wheel of brie in the middle.
7. Wrap the puff pastry up around the brie.
8. Place the brie on a baking sheet with parchment paper (any kind of baking paper really) and bake for 20-30 minutes until the pastry begins to turn golden brown.
9. Serve with crackers

Enjoy!!!

Sunday, March 9, 2008

March Potluck!

I have a small dinner party every now and then with friends that are still in the area. It's a great time for me to try new recipes and such so I can get feedback. And I can also eat a ton since everyone else brings lots of food too!

I ended up making two dishes for the potluck. By request, I made a Baked Brie (I will post the recipe later this week). I made a Baked Brie for the first time at my Housewarming party and ever since, my friends have demanded that I bring it to any special event :P

The other dish I made was a from a food network recipe my sister sent me. In her own words, it looked "Sooooo Goooooood!" on tv and that I "should make it because food network is awesome." The recipe is called "spicy" macaroni WITH cheese. I say "spicy" because the recipe (will post later) requires 1/2 teaspoon of red pepper flakes. Now, some may be very sensitive to that amount of spice, but not my burned out tastebuds. Anyway, I put in a tablespoon and it still didn't taste spicy at all. Also, this is more of macaroni with cheese rather than macaroni AND cheese...mainly because there's really more macaroni mass than cheese. This recipe didn't use any sort of cream or a lot of butter so the creamy cheesy effect isn't there. That's not to say that it wasn't good...it was very tasty! It uses melted mozzarella, romano, and parmesan as well as a dash of cilantro and basil which I found very flavorful.

Anyway, here are the pictures!

The macaroni:


Baked Brie!


Rod Dee food from Frank (Thai restaurant in Brookline...will do a post on them sometime in the future...keep forgetting my camera when I go):


Lisa's Pork Loin!


Linh's egg-less brownies:


John brought a cake that I forgot to take pictures of and Jason brought some hummus...which I also forgot to take pictures of. Next time!

Tuesday, March 4, 2008

Cafe Mami in Porter Square

One thing about going to school in the area means that one will usually get familiar with the cheap and good eats around the area. Not so in this case. It took me a full 3.5 years before I even set foot in this tiny bistro (And by bistro, I'm being generous :P).

Cafe Mami is a tiny little 15 seat restaurant in what is known as the Porter Exchange in, of course, Porter Square, Cambridge. Anyway, the Exchange houses six different Asian restaurants (mostly Japanese) along with an Asian Grocery store (Again, more catered towards Japanese cuisine), and a Bubble tea stand, among other things.

But onto the food! When I lived in the area, it was common to see me at Cafe Mami close to twice/three times a week, and that's not really stretching the truth that far. I started off craving the Tokyo Hamburger Set but as time passed, I just started ordering the Tatsuta Curry every time.

And I'd always describe the place with a hearty "Soooooooooooooo Gooooooooooooooooooood!" when trying to convince anyone, friend or foe, of the good AND cheap eats available in town.

So here's a couple pictures of the place and the food!


The yummy Tatsuta Curry! Especially good with the egg :P

Sunday, March 2, 2008

Making tasty bags of Money!

Wow, what a laaazy weekend...as Jason noted, this is probably the first time he's ever called and woken me up. And I had gone to sleep around 11pm or so...and Jason called at Noon!!! Insane.

So my friends experienced first hand last week the mass of recipes I have to go through and it is...so to say...a mass. I have about 100 recipes plus several cookbooks I've been going through about 2-3 different recipes a week. And I have yet to get to Grace Young's cookbook! I'll get there eventually.

Honestly, I cook at least 4-6 servings whenever I get my act together because as we all know, leftovers are a professional worker's best friend! But then again, one tends to get tired of the same food day after day you know? So then I'll cook twice during the week and alternate the leftovers...but then there's too many leftovers! But too much is the lesser of the two evils anyway :)

I actually made this a couple weeks ago for a friend's pot luck and they got gobbled up pretty quickly. But I was amazed at how LONG it took me to wrap these little guys. Well, I'll let you see for yourself :)

Now, I get my ground pork from the Asian market mainly because the pork is ground a lot coarser than in a regular supermarket and especially because it's not prepackaged. I can actually watch them put the pork through the grinder which makes me a little warmer on the inside. It's just a personal preference so I don't think it's necessarily a big deal.

Pork and Shrimp Wontons

Ingredients:
1 lb Ground Pork
1/4 - 1/2 lb raw Shrimp
Scallions
2 tsp corn starch
2-3 TBsp soy sauce

1 box/tray of wonton wrappers
Some water OR egg white

Optional:
Fish Sauce
Sesame Oil

Prep Method:
1. Mix together the corn starch and soy sauce as well as the optional ingredients, if any. Set aside.
2. Rinse, de-shell and de-vein the shrimp. Dice finely.
3. Mix Pork, Shrimp and Scallions together.
4. Pour the Sauce over the filling mixture and mix again.

Now onto actually rolling the wontons...I've got pictures here for help :)

Rolling the wontons:
1. Fill a small dish with water (or the egg white) and have plenty of paper towels available.

2. Now we're ready to begin. Start with a single wonton wrapper and a small spoonful of the meat mixture. It's important not to overfill the wonton (underfilling is ok) because it'll be difficult to wrap it otherwise.

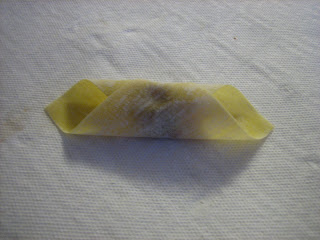
3. Next, we roll the wonton diagonally as shown. Start at one corner, fold it in towards the middle, and then roll towards the other corner. Dab a drop of water on the opposite corner to get the wonton "cannoli" to hold together.

4. Once you have the "cannoli" look going, take one of the ends and bend it upwards against the meat, almost like folding a sheet of paper.

5. With your thumb and forefinger, twist the folded end upwards. You'll be twisting from the "corner" of where you initially made the first fold...be careful not to tear the wonton wrapper. Put a dab of water where the parts of the wonton wrapper touch near the meat.

6. Repeat for the other corner:

7. Repeat for the next hour or so:


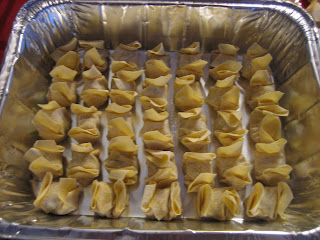
I ended up using just about the whole package of wontons so I'm guessing somewhere between 75 and 100 wontons. You can fry these little money-bags, steam, or even boil. They're a great extra snack with some Egg/Wonton noodles for a quick meal.

One more thing to note: When placing the finished wontons in a dish, make sure the wontons do not touch each other. They'll stick...which isn't good!!!

For freezing the wontons, freeze them on a plastic plate or something first (so they'd be separated), then you can throw them in a bag.

Enjoy!!!